Today, I write about how I set up a 1.18.2 Spigot server in Eclipse which lets you hot-swap plugins in Java 17.
It’s just like any regular mad-coding session. I’m busy testing some niche little feature of the CommandAPI and decide to attach a remote debugger to my current Spigot server. Using the power of breakpoints and variable watches, I find the source of my problem and adjust the source code to rectify it. Naturally, the Ctrl+S shortcut is activated and Eclipse shows a giant warning dialog saying that “Hot Code Replace Failed”. Fair enough, I’m not expecting my code to hot-swap right there and there, but then I start thinking about the possibility of being able to hot-swap a Spigot plugin while the Spigot server is running. Just think about how great that would be! Instead of having a convoluted development cycle of:
- Make the change in the plugin
- Build the plugin
- Type
/reload - Test the plugin
Or even worse, testing a plugin that is sensitive to /reload such as my CommandAPI plugin:
- Stop the server
- Build the plugin
- Delete the old copy of the plugin from the server’s
plugins/folder - Copy the plugin over to the server’s
plugins/folder - Start the server up again
- Test the plugin
I could go straight to:
- Make the change in the plugin
- Test the plugin
Researching
To start off, I remember that I found a Bukkit post Using JRebel with Bukkit. Yes, it’s a bit old (dating back to 2013), but I think it’s a good start. It goes on to briefly describe what JRebel is: a toolkit to reload Java code changes while a program is running - in simple terms: Hot-swapping support for Java applications. I read through the instructions on the Bukkit post and discover that in order to use JRebel, I would need to have a JRebel account. The Bukkit post goes on about setting up a free account by signing up with a Twitter or Facebook account, but it appears unsurprisingly that this is no longer an option.
At this point, I have the choice of trying out the JRebel free trial for 14 days, or searching for a more permanent solution. I decide to take the permanent solution route, and come across Hotswap Agent, a tool for hot-swappable code! Before diving into the nitty-gritty of what it is and how it works, I decide to search if anyone has managed to use this Hotswap Agent for Spigot plugin development and I was able to stumble upon a Spigot resource which appears to be doing exactly what I want: [GUIDE] Windows - Extremely productive development environment. At the top of this post, there’s a notice going on about how the guide is outdated, so I naturally follow the link to the updated guide here.
The guide is fairly comprehensive, explaining how to set things up for Windows and IntelliJ. It also has a great introduction which briefly describes a project DCEVM which appears to be a patch of the JVM which lets you hotswap code beyond what could normally hotswapped (for example, adding and removing methods). Despite this, as of the time of writing, the guide doesn’t fulfil my requirements:
- I want to use Eclipse, not IntelliJ
- I want to use Java 17, not Java 8 or 11
- I want to use this with a Spigot server, not just any ol’ demo
Setting up a hot-swappable development environment for Java 17
So, I could continue writing this blog post about how it took me about a day to find all of the guides that I needed and all of the obstacles I bumped into, but nobody really wants to read that, so I’m just going to cut to the chase and say what I did to get this to work.
Setting up DCEVM and hotswap-agent.jar
- Get a copy of the JetBrainsRuntime with DCEVM for Java 17. Every guide online just points you to the JetBrainsRuntime releases page, but as of the time of writing, the download you’re actually looking for is not on the first page. I used Release 17_0_1-b164.8 and downloaded JBR with JCEF (DCEVM):
jbr_dcevm-17_0_1-windows-x64-b164.8.tar.gz - Install the JetBrainsRuntime just like how you’d install a normal JDK. On Windows, this consists of unpacking the
.tar.gzfile into a suitable folder, adding the folder to yourJAVA_HOMEsystem environment variable (and if you haven’t done so already, adding yourJAVA_HOMEenvironment variable to your system environment variables) - Get a copy of
hotswap-agent.jar(with Java 17 support) from HotswapAgent. I downloadedhotswap-agent-1.4.2-SNAPSHOT.jarfrom 1.4.2-SNAPSHOT (2022-01-19) and renamed it tohotswap-agent.jar - In your JetBrainsRuntime, create a folder
hotswapinside thelibfolder and place thehotswap-agent.jarfile there
Set up a Spigot server
Create a spigot testing server - this should be fairly straightforward, but just in case you haven’t done this before:
- Grab a copy of Spigot from getbukkit.org. I used Spigot 1.18.2
- Create a folder and place your
spigot-1.18.2.jarfile inside it - Run the server using
java -jar spigot-1.18.2.jar. This installs the server and starts up a basic Minecraft server. You’ll have to accept the EULA if this is your first time (there’s a fileeula.txtwhich is automatically generated which prevents you running a server unlesseulahas been set totrue) - Restart the server (after accepting the EULA) so everything loads properly, then shut it down
Set up your plugin development environment
In order to use hotswap to its best capabilities, it likes hooking into Maven projects. If you’ve never made a Maven project, then firstly what are you doing? and secondly here’s how to do this:
- In Eclipse, set up a new simple Maven project (no archetype). This should generate a basic Maven problem with the relevant
src/main/*andsrc/test/*folders, and a basicpom.xmlfile. Configure your
pom.xmlfile. I simply added the Spigot API as a dependency as described here and told the Maven compiler plugin to use Java 17 for compilation:1 2 3 4 5 6 7 8 9 10 11 12 13 14 15 16 17 18 19 20 21 22 23 24 25 26 27 28 29
<repositories> <!-- This adds the Spigot Maven repository to the build --> <repository> <id>spigot-repo</id> <url>https://hub.spigotmc.org/nexus/content/repositories/snapshots/</url> </repository> </repositories> <dependencies> <!--This adds the Spigot API artifact to the build --> <dependency> <groupId>org.spigotmc</groupId> <artifactId>spigot-api</artifactId> <version>1.18.2-R0.1-SNAPSHOT</version> <scope>provided</scope> </dependency> </dependencies> <build> <plugins> <plugin> <artifactId>maven-compiler-plugin</artifactId> <version>3.8.1</version> <configuration> <release>17</release> </configuration> </plugin> </plugins> </build>
- Create everything else your plugin needs. This includes your standard
plugin.ymlfile in yoursrc/main/resourcesfolder and your main plugin.javafile(s) insrc/main/java
Set up Eclipse to debug with hot-swapping
Right click your project and go to
Debug As > Debug Configurations...Create a new
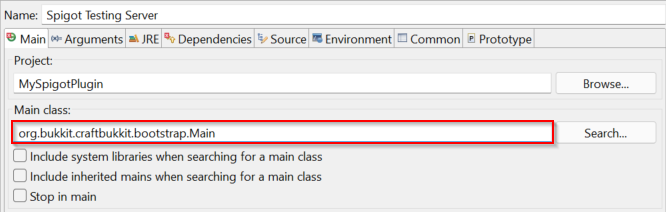
Java Applicationdebug configurationIn the “Main” section, set the “Main class” as
org.bukkit.craftbukkit.bootstrap.Main. This is the main entrypoint for the Spigot server, and can be found insideMETA-INF/MANIFEST.MFin your server’s.jarfile. For example, this is theMANIFEST.MFfile forspigot-1.18.2.jar:1 2 3
Manifest-Version: 1.0 Created-By: Plexus Archiver 4.2.1 Main-Class: org.bukkit.craftbukkit.bootstrap.Main
![Setting the main class]()
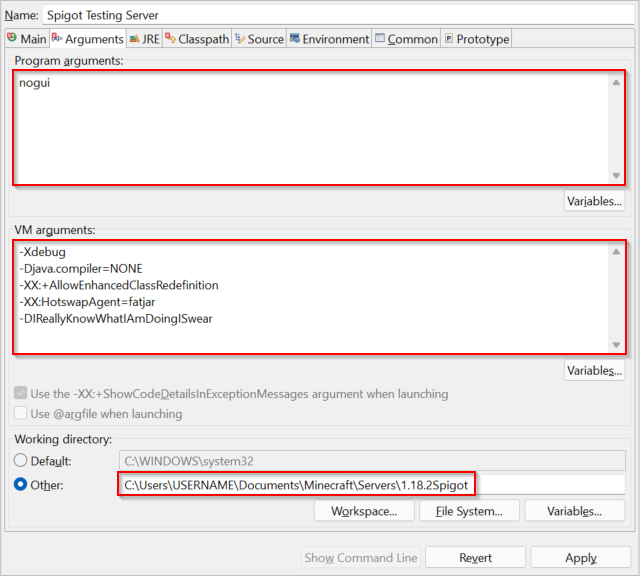
In the “Arguments” section, add
noguito “Program arguments” (to prevent the server’s GUI showing)In the “Arguments” section, add the following to “VM arguments”:
1
2
3
4
5
-Xdebug
-Djava.compiler=NONE
-XX:+AllowEnhancedClassRedefinition
-XX:HotswapAgent=fatjar
-DIReallyKnowWhatIAmDoingISwear
The
-XX:+AllowEnhancedClassRedefinition -XX:HotswapAgent=fatjaroptions are specific to using Hotswap and are the basis of setting it up for Java 17. The-DIReallyKnowWhatIAmDoingISwearis a special flag for Spigot which disables the update checker to improve server start-up times.There are a lot of resources online which describe how to set up Hotswap Agent using various other VM flags such as
-XXaltjvm=dcevm -javaagent=/hotswap-agent.jaror-XX:HotswapAgent=core- these do not work for Java 17.Set the “Working directory” to your Spigot server location
![Setting the main class]()
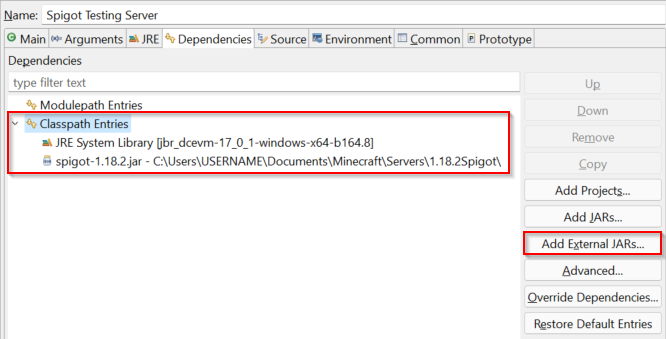
In the “JRE” section, make sure you are using the JetBrainsRuntime DCEVM that you installed earlier
In the “Dependencies” section, remove the project and Maven Dependencies from the “Classpath Entries”. Using “Add External Jars”, add your Spigot server
![Setting the main class]()
Debugging your plugin
Before we can begin debugging, we first need to compile your plugin. This can be done in Eclipse by using Run As > Maven clean, then Run As > Maven install, or by running mvn clean install or mvn clean package in your plugin’s working directory. This generates your plugin jar file in the target/ folder which you need to copy over to your server’s plugins/ folder.
Now that you’ve installed the JetBrainsRuntime with DCEVM, set up the hotspot agent, set up a Maven project and a Spigot server and set up Eclipse to debug with hot-swapping, you’re ready to begin debugging! Right click your project, Debug As > Debug Configurations... and select the debug configuration that we just made. Press “Debug” in the bottom right corner and you’re ready to go!
This starts your Spigot server and lets you hot-swap code while the server is running, without having to reload or recompile your plugin. Simply make the change that you want in your .java class file and press save to automatically reload the changes into Spigot.
HotSwap pitfalls
In the process of discovering all of this, I discovered three main issues which took way too long to figure out. Here’s my list of “I really wish I knew this stuff before I started playing with HotSwap”:
Hotswap isn’t magic
When I first tried using Hotswap, I started off with a very simple project with an unending while loop which prints something to the console. I then changed the text that was being printed to the console and discovered that hot-swapping did nothing. Conveniently, after debugging the issue, I discovered a blog post Demonstrating the HotSwap JVM which explains that hot-swap cannot reload methods that are currently running.
Hotswap doesn’t work with Paper
For reasons beyond my understanding, hot-swap doesn’t work with paper. I have no idea what it is, but it just doesn’t work. Try using Spigot instead!
I couldn’t get hotswap to work remotely
Normally for plugin debugging, I used a remote debugging setup. For some reason, I couldn’t get Hotswap to work with my remote debugging setup.
Conclusions and further reading
To conclude, I figured out how to hot-swap code in a plugin which is running on a Spigot server, and hopefully you too can do the same! I specifically wanted a guide for Eclipse, but there are many guides for more popular IDEs such as IntelliJ, which I would highly recommend if you want to learn more about how DCEVM and Hotswap Agent works. I have yet to play around with this in my own Spigot plugins, but hopefully this will speed up my development cycle with less reloads!
- Quick Start JDK 17 - HotSwapAgent’s official quick start guide to setting things up for Java 17
- Hot Swapping - A hot-swap setup guide for Java 8 or Java 11 using IntelliJ
- Using DCEVM / Hotswap Agent in Java development - A comprehensive guide on setting up hot-swap which includes more information about how it works and how to set it up for Java 8 or Java 11
- Demonstrating the HotSwap JVM - A blog post showcasing hot-swap for a simple Java application