After my previous post, I want to explain a little more on how I create those Blockly blocks. To do so, I’m providing an example of adding the ability to let a Minecraft player perform a command. If you have not read my previous post, I highly recommend you do (to get some context for this post).
Blockly blocks are created using the BlockFactory. This is a tool to create blocks, using Blockly (surprisingly). This tool starts off with a basic template, which allows you to add blocks to define your custom block.
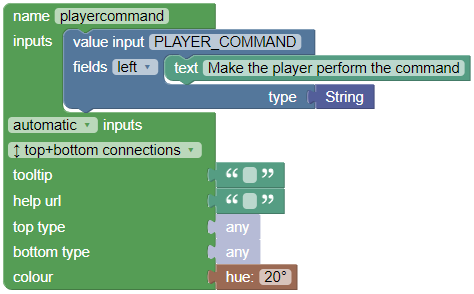
- Name - a unique identifier for webpage usage
- For the name, I give a value to resemble a player performing a command, such as “playercommand”.
- Inputs - input values for the block
From the Bukkit API documentation for a player performing a command, it requires the input of a String (the command to be performed). I add that as a value input - an input which requires a value to be entered - from the Input tab on the left hand side. Since this input will probably be required throughout the code generation, it’s a good idea to give it a unique identifier, so I choose
PLAYER_COMMAND(for other blocks, this unique identifier can be very important).To give the player an idea of what this block will do, I add a text field from the Field tab. (I make sure to use a text field, as opposed to a text input field, since I want to allow users to enter their custom text values (so, for example, something created by string concatenation)). I ensure that the type for this field is String from the Type tab, and then add some text to make the block seem intuitive.
- Connections - the shape of the block
- To allow this block to be inserted in a sequential manner (so, one operation after another), I make sure the block had top and bottom connections.
- Tooltip
- Since my project is still in beta, I have yet to create documentation and tooltips for each block, so for the time being, I left these blank. Ideally, I’d write an explanation for the tooltip option which summarises the use of the block.
- Help url
- Likewise, with tooltips, I have yet to create a help document which would be linked via the help url option.
- Top and bottom types
- Since my project can allow any type of “operation” to be executed from above and below, these types are left as “any”.
- Colour
- To match my colour scheme of having brown blocks represent an action, I make sure the colour is
20°.
- To match my colour scheme of having brown blocks represent an action, I make sure the colour is
These settings are shown below:
Which produces the following block:

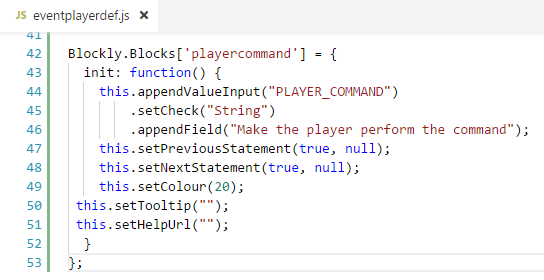
Next, we have to “import” this block into our blockly project. The BlockFactory produces two main pieces of code: A block definition (some code which outlines the structure of the block), and a generator stub (some code which converts the block-code to code). I find it easier to separate the two into two files: namedef.js and name.js (where “name” is the name of the file). Since I use JavaScript for the block definitions, I make sure to copy the JavaScript version of the block definition to the relevant _def.js file (in this case, I use the eventplayerdef.js file to store information about a player).
Likewise, I copy the code from the Generator stub into my eventplayer.js file:

In addition, I make sure to add an xml entry in the index.html file, so that it would be visible in the sidebar:
1
2
3
<category name="Event player">
    <block type="playercommand"></block>
</category>
Now comes the best part: Converting the blocks to code. This is done in my eventplayer.js file, where my “generated stub” is. I simply write the implementation from the given command input:
1
2
3
4
5
6
Blockly.JavaScript['playercommand'] = function(block) {
  var value_player_command = Blockly.JavaScript.valueToCode(block, 'PLAYER_COMMAND', Blockly.JavaScript.ORDER_ATOMIC);
  // Make the player perform the input command
  var code = 'event.getPlayer().performCommand' + value_player_command + ';\n';
  return code;
};
My current implementation of strings automatically put a pair of brackets around the string. Therefore, it isn’t required to add brackets around the method, however doing so would not affect the code in any negative way.
And that’s all there is to it. The stated changes are viewable in the respective commit on my GitHub page for the PluginCreator, and the player command block is also usable on my live project page.